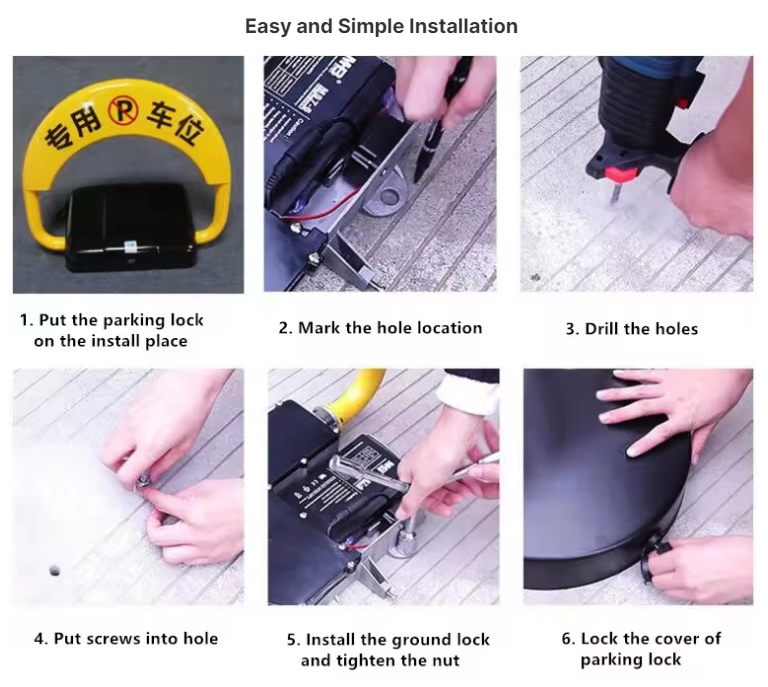
Correctly installing a parking lock begins with preparing the right tools, centering the device in the bay, anchoring it securely, and testing stability after installation.
Why parking lock installation matters
Correct parking lock installation prevents unauthorized vehicles from using your space, improves parking utilization, and protects your vehicle from damage. A lock that is set in the center of the bay and anchored to solid concrete delivers reliable control and reduces disputes over parking availability.
- Proper installation keeps the lock perpendicular to the floor and prevents the device from being bypassed from either side.
- A well-installed lock reduces unauthorized parking and maintains clear access for the intended vehicle.
- Secure anchoring lowers long-term maintenance costs and extends the life of the lock.
Tools and materials to prepare
Preparing the right tools and fasteners ensures the installation is stable and durable.
- Parking lock kit with matching mounting holes
- Screwdriver or impact driver for the selected fasteners
- Socket wrench or adjustable wrench
- Hammer drill and concrete drill bit sized for the anchor bolts
- Pencil or chalk for marking
- Tape measure and square to find the bay center
- Vacuum or brush to clear dust from drilled holes
- Anchor bolts, wedge anchors, or epoxy anchors sized to the lock and substrate
Choose screws and anchors that meet the lock manufacturer's specifications and match the ground material. Using undersized fasteners or the wrong anchor type can make the installation unstable.
Step 1: determine the correct location
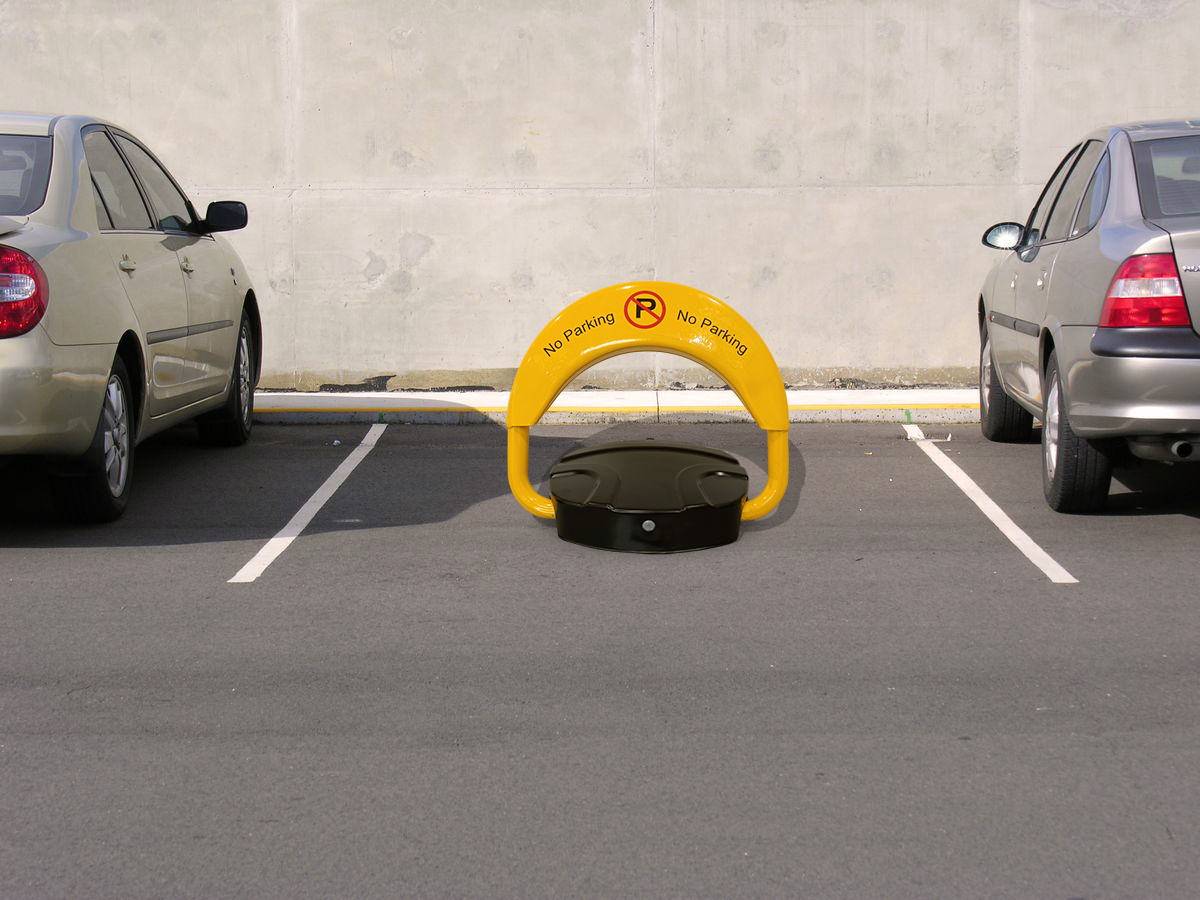
The parking lock should be placed at the center of the space so vehicles cannot bypass it around the sides. Measure the width of the parking bay and mark the centerline, then position the lock so its mounting holes line up with the center marks.
1. Measure the parking space width and depth.
2. Mark the center of the bay with pencil or chalk.
3. Confirm the lock is positioned so the raised arm blocks the intended vehicle path.
4. Make sure there is enough clearance for opening doors and walking around the vehicle.
Step 2: drill holes in the marked locations
Drill the mounting holes to the size and depth required by the anchor bolts, and clean out all dust before inserting the anchors. Use a drill bit that matches the anchor diameter, typically 12mm to 16mm for concrete installations, and drill deep enough for the full anchor length.
- Set the hammer drill to the correct speed for concrete or masonry.
- Drill straight down at each marked point to keep the anchor secure.
- Vacuum or blow out the hole to remove debris before installing the bolt.
- Check the anchor instructions for the correct embedment depth.
Step 3: anchor the parking lock securely
Place the parking lock on the drilled holes, keep it perpendicular to the ground, and tighten the anchors until the lock is firm without over-torquing. Proper anchoring is the key to a long-lasting, stable installation.
1. Align the lock with the drilled holes.
2. Insert the anchor bolts or wedge anchors through the lock base and into the holes.
3. Tighten the fasteners evenly, using a wrench or socket driver.
4. Avoid excessive torque that can strip the anchor or crack the concrete.
If the lock includes a hinge or folding arm, verify the arm moves freely before final tightening.
Step 4: verify the installation and test the lock
A secure installation should feel solid and show no wobble when the lock is shaken gently. Test the lock operation and inspect the mounting points immediately after installation.
- Shake the lock by hand to confirm it does not move.
- Cycle the lock through its raised and lowered positions if it is a folding model.
- Check the anchor heads for any gaps or loose movement.
- If the lock is not stable, loosen the bolts and re-seat the anchors or replace them with a stronger type.
Maintenance checks after installation
Routine inspection keeps the parking lock functioning safely and prevents premature wear. Inspect the lock every three to six months, especially after heavy use or harsh weather.
- Clean the area around the base to remove dirt and debris.
- Tighten any loose bolts or anchors.
- Lubricate moving parts if specified by the manufacturer.
- Replace rusted fasteners or damaged components promptly.
Regular maintenance helps the lock remain secure for years and preserves parking resource management.
FAQ: Parking lock installation questions
Q: What is the most important step in installing a parking lock?
A: The most important step is anchoring the parking lock to a firm concrete surface with the correct anchor type and depth, because this determines long-term stability.
Q: Can I install a parking lock on asphalt?
A: Asphalt is not ideal for permanent parking lock installation because it is too soft for anchor bolts; concrete is the preferred substrate for secure, long-lasting installations.
Q: How do I choose the right drill bit for my parking lock?
A: Choose a drill bit that matches the diameter and depth specified by the anchor bolt manufacturer, usually noted in the lock installation manual.
Q: Why should the lock be installed in the center of the parking space?
A: Center placement keeps vehicles from driving around the lock on either side and ensures the lock controls the full width of the bay.
Q: When should I re-check the parking lock after installation?
A: Re-check the installation immediately after tightening, then schedule inspections every 3–6 months, or sooner if the lock is exposed to heavy use or harsh conditions.
Contact us for product support
If you have questions about our parking lock products or need installation advice, email us at ricj@cd-ricj.com.
Post time: Apr-23-2026


